Meta Description Concept: “Unlock the secrets to growing colossal cauliflower in a pot! Discover step-by-step guidance, insider tips, and breakthrough techniques to cultivate monster heads right on your patio. Get ready for an epic harvest!”
Unlock the Secrets: How to Grow the Largest, Most Magnificent Cauliflower in a Pot – Your Ultimate Guide to a Bountiful Harvest!
Imagine this: a magnificent, creamy white cauliflower head, so perfectly formed and impossibly large, it takes your breath away. Not in a sprawling garden, mind you, but thriving right there on your patio, in a humble pot. Sounds like a dream? A gardener’s fantasy? Well, prepare to turn that fantasy into a vibrant, edible reality. Because today, we’re not just growing cauliflower; we’re embarking on a journey to cultivate a colossal champion, right where you least expect it. This isn’t just about planting seeds; it’s about mastering a subtle art, uncovering hidden truths, and unlocking the very genetic potential of this remarkable brassica. Are you ready to transform your container garden into a stage for horticultural triumph? Get ready, because the secrets to unprecedented cauliflower grandeur are about to be revealed.
The Astonishing Potential of Potted Perfection: Why Cauliflower in a Pot?
You might be wondering, “Cauliflower in a pot? Isn’t that reserved for sprawling vegetable patches?” And for years, that was the conventional wisdom. But innovative gardeners, driven by limited space and boundless ambition, have shattered that myth. Growing cauliflower in containers offers a myriad of surprising advantages that traditional ground planting simply can’t match. It’s about control, convenience, and cultivating a level of perfection that might just make your neighbors green with envy.
Think about it: portability. Your potted cauliflower becomes a mobile masterpiece, allowing you to chase the sun, shelter from harsh winds, or even move it indoors during unexpected cold snaps. This unparalleled flexibility offers a crucial edge, especially when striving for maximum size and quality. Furthermore, container gardening provides an unparalleled level of precision in managing soil conditions, nutrients, and moisture – factors that are absolutely critical for cultivating a prize-winning cauliflower. But the real magic lies in something even deeper: the ability to micro-manage its environment, a power rarely afforded to those rooted directly in the earth. Curious how this granular control translates into monstrous curds? Let’s delve deeper into the strategic advantages you’re about to unleash.
Beyond Convenience: Unlocking Superior Growth Through Container Control
The beauty of a pot isn’t just its mobility; it’s the encapsulated ecosystem you create. Within those walls, you dictate every variable. You select the perfect, well-draining soil mix, free from the compaction or nutrient deficiencies often found in garden beds. You precisely deliver nutrients, ensuring no precious element is wasted or washed away. This targeted approach is the cornerstone of growing exceptional cauliflower. It’s like building a bespoke mansion for your plant, tailored to its every need, rather than letting it rough it out in the wild.
ADVERTISEMENT
Moreover, pest and disease management becomes vastly simpler. You can inspect your plant from all angles, spot trouble early, and isolate an affected pot before problems spread to your entire garden. This vigilance is a game-changer when you’re aiming for a flawless, unblemished head. The control you gain isn’t just about preventing disaster; it’s about proactively optimizing every growth parameter. Ready to learn how to choose the very best foundation for your potted prodigy? The next step is paramount.
Choosing Your Champion: Selecting the Right Cauliflower Variety for Pot Cultivation
Not all cauliflowers are created equal, especially when it comes to container gardening. While some varieties sprawl and demand vast acreage, others are specifically bred for more compact growth, yet still possess the genetic blueprint for impressive head size. This is where your journey to a colossal cauliflower truly begins – with an informed selection that sets the stage for success. Skip this crucial step, and you might find yourself wrestling with an uncooperative plant that simply refuses to reach its full, magnificent potential in a pot. So, what exactly should you look for in a champion variety?
For large heads in pots, look for varieties described as “compact,” “patio,” or “early maturing.” Don’t let the “compact” label fool you; these varieties often redirect their energy into forming a dense, sizable curd rather than excessive foliage. Varieties like ‘Snowball Y Improved’ or ‘Self-Blanche’ are popular choices, known for their reliability and respectable head size even in confined spaces. However, for truly *gigantic* results, you’ll want to explore options like ‘Giant of Naples’ or ‘Veronica’ (Romanesco types often grow quite large, too, if you’re open to something different!), understanding that these might require slightly larger pots and meticulous care. The key is to match the variety’s growth habit with your container size and commitment. But variety is just one piece of the puzzle; the true secret to unlocking its maximum potential lies in a surprising factor that most gardeners overlook.
Beyond the Seed Packet: Unearthing the Genetic Edge
While the variety name provides a good starting point, dive deeper into descriptions for traits like disease resistance and blanching characteristics. Some varieties are “self-blanching,” meaning their leaves naturally curve over the head, protecting it from sunlight and keeping it white. This is a massive time-saver and a crucial advantage for maintaining curd quality. Furthermore, understanding the days to maturity will help you plan your planting schedule to hit optimal growing conditions. Remember, a healthy plant, even a compact one, has the inherent capacity to produce an impressive head if given the ideal environment. But how do you create that ideal environment from the ground up? It all starts with the humble container itself.
ADVERTISEMENT
The Pot Paradox: Where Size Truly Matters for Your Cauliflower Behemoth
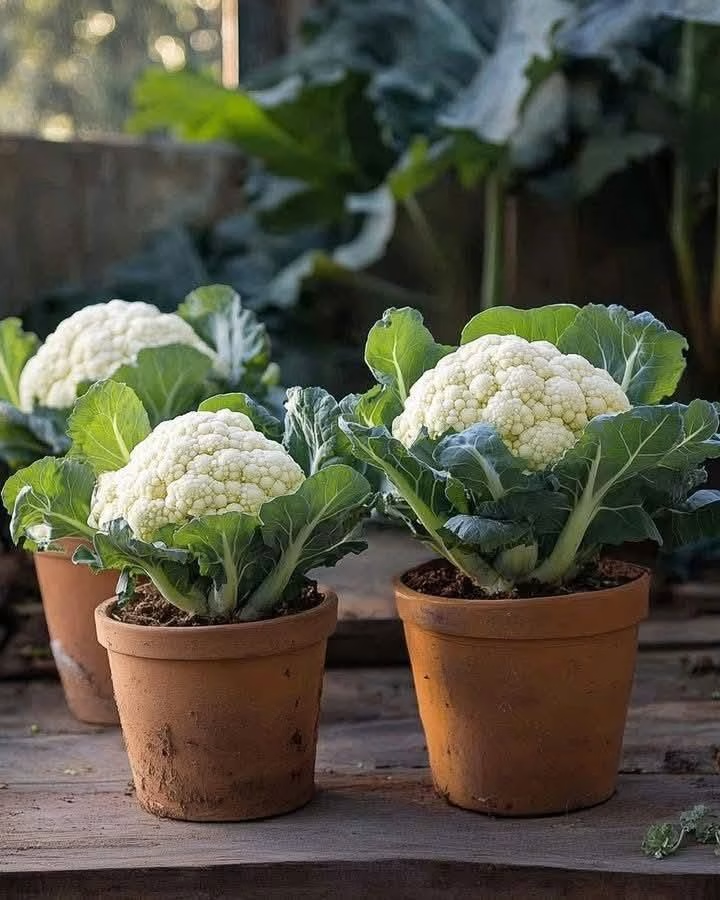
You’re dreaming of a cauliflower head the size of a small watermelon, but trying to grow it in a pot meant for petunias? That’s a recipe for disappointment. The size of your pot is not just a suggestion; it’s a non-negotiable requirement for cultivating truly massive cauliflower. This seemingly simple choice is perhaps the single most overlooked factor that separates a decent harvest from a truly spectacular one. A cramped root system means a stressed plant, and a stressed plant simply cannot dedicate the energy needed to produce those coveted, colossal curds. So, what’s the magic number?
For a single cauliflower plant destined for greatness, aim for a pot that holds at least 15-20 gallons (around 60-75 liters) and has a diameter of at least 18-24 inches (45-60 cm). Deeper pots are always preferable, allowing the taproot ample room to plunge downwards and anchor the plant, providing stability for the heavy head to come. Material matters too: porous materials like terracotta can dry out quickly, while plastic or glazed ceramic retain moisture more effectively. Whatever you choose, ensure it has ample drainage holes – a critical detail that prevents root rot, the silent killer of many container-grown plants. But choosing the right pot is only half the battle; the true foundation of your cauliflower’s success lies within it. Are you ready to unlock the secrets of the perfect growing medium?
The Unseen Infrastructure: Drainage and Root Development
It’s not enough to just have a big pot; it must also be a well-drained pot. Cauliflower hates “wet feet,” meaning perpetually soggy soil. Excess water deprives roots of oxygen, leading to disease and stunted growth. Ensure your chosen container has multiple, adequately sized drainage holes. You might even consider elevating the pot slightly off the ground to improve airflow around the bottom, further enhancing drainage. Proper drainage ensures that even with generous watering, the roots remain healthy and robust, ready to support the massive growth above ground. This foundational element is often underestimated, yet it holds the key to a thriving, giant cauliflower. But what goes into this perfect pot, the very essence of its growing power? Let’s talk soil.
Soil: The Unsung Hero – Crafting the Perfect Medium for Maximum Growth
If the pot is the mansion, then the soil is the opulent interior, the very foundation upon which all growth rests. This isn’t just any dirt; it’s a meticulously crafted blend designed to provide optimal aeration, moisture retention, and nutrient availability. Skimp on soil quality, and you’re kneecapping your cauliflower’s potential before it even begins. This is where an “aha moment” truly hits: successful container gardening isn’t about replicating garden soil; it’s about surpassing it with a custom-engineered blend that caters precisely to the plant’s needs. Are you ready to mix a masterpiece?
For cauliflower, a rich, well-draining potting mix is paramount. Avoid heavy garden soil, which compacts easily in pots, suffocating roots. Instead, create a blend that might seem a little unusual at first but is designed for maximum impact. Start with a high-quality, peat-moss or coco coir-based potting mix as your base. To this, add generous amounts of compost or well-rotted manure (at least 25-30% of the total volume) for nutrient enrichment and improved structure. Perlite or vermiculite (another 10-15%) are non-negotiable for superior drainage and aeration. You’re aiming for a mix that feels light and fluffy, drains quickly, yet retains moisture effectively. This engineered environment provides the perfect balance, ensuring your cauliflower’s roots can breathe and feast. But there’s one more subtle ingredient that elevates this mix from good to great: pH. Don’t skip this critical detail.
ADVERTISEMENT
The pH Perfection: Balancing the Soil Equation
Cauliflower thrives in slightly acidic to neutral soil, with a pH range of 6.0 to 7.0. If your soil is too acidic or too alkaline, essential nutrients become locked up, unavailable to your plant, no matter how much you fertilize. This is a common pitfall. A simple soil test kit, readily available at garden centers, is a worthwhile investment. If your pH is too low (acidic), add a little garden lime. If it’s too high (alkaline), incorporating more peat moss or elemental sulfur can help. Achieving this optimal pH ensures that every nutrient you painstakingly add is readily absorbed, fueling the massive growth you’re striving for. Now that your pot is ready and your soil is perfect, it’s time for the moment of truth: getting your cauliflower started.
From Seed to Splendor: Sowing Seeds vs. Transplants for a Head Start
The journey of a thousand cauliflower heads begins with a single step, and that step is choosing whether to start from seed or opt for nursery transplants. Both methods have their merits, but for cultivating the largest possible cauliflower, one often holds a distinct advantage. This choice dictates your control over the plant’s earliest, most vulnerable stages, a period that significantly impacts its ultimate size and vigor. Will you embrace the challenge of nurturing from scratch, or leverage the convenience of a pre-started plant? The decision isn’t as straightforward as it seems.
Starting cauliflower from seed indoors, about 6-8 weeks before your last anticipated frost date, gives you unparalleled control over the plant’s early development. You choose the exact variety, ensure proper spacing, and provide ideal light and temperature conditions, minimizing transplant shock when they eventually move to their permanent pots. Use seed-starting mix in trays, barely covering the seeds, and keep them consistently moist. Once seedlings develop a few true leaves, gently transplant them into larger individual pots (3-4 inches) to continue their growth before moving to the final 15-20 gallon container. This early nurturing is crucial for developing a strong root system, which is the engine for a massive head. However, if time is of the essence or you prefer convenience, carefully selected transplants can also work. But here’s where it gets interesting: even with transplants, you still need to be a master of transition. Never underestimate the psychological impact of moving a plant from one environment to another.
The Gentle Hand: Acclimatizing Your Young Champions
Whether from seed or transplant, the transition to their final outdoor pot requires careful “hardening off.” This means gradually exposing your young plants to outdoor conditions – sunlight, wind, and fluctuating temperatures – over 7-10 days. Start with a few hours in a sheltered, shady spot, increasing exposure daily until they can withstand full sun for a whole day. This slow acclimation prevents shock, which can stunt growth and delay maturity, potentially shrinking your future giant. Remember, any stress early on can reduce the ultimate size of your cauliflower head. Once hardened off, plant your seedlings or transplants deeply into your prepared large pots, ensuring the first set of true leaves is just above the soil line. Water thoroughly. Now, the real work begins: the daily art of keeping your plant happy and hydrated.
ADVERTISEMENT
The Art of Watering: Hydration as the Key to Cauliflower Grandeur
Watering isn’t just about wetting the soil; it’s a nuanced dance, a critical conversation between you and your cauliflower. Get it wrong, and you risk everything: stunted growth, bitter curds, or worse, a complete crop failure. For a plant striving for immense size, consistent moisture is non-negotiable. Think of water as the transport system for all the nutrients your plant needs; without a steady flow, the entire operation grinds to a halt. This often overlooked detail holds a secret to unlocking maximum yield: it’s not just *how much* you water, but *when* and *how* you water. Are you truly listening to your plant’s needs?
Cauliflower has a relatively shallow root system, especially in pots, and it demands consistent moisture. Never allow the soil to completely dry out, as this stresses the plant and can lead to “buttoning” – premature formation of tiny, unusable heads. Check the soil moisture daily by sticking your finger about an inch or two into the soil. If it feels dry, it’s time to water. Water deeply and slowly until water drains from the bottom of the pot. This ensures the entire root ball is saturated. However, be equally careful not to overwater, as soggy conditions can lead to root rot. Good drainage, as previously discussed, is your safeguard here. During hot, dry spells, you might need to water twice a day. The key is consistency. But consistent hydration is only one part of the equation; your giant cauliflower also has a prodigious appetite for specific nutrients. Are you ready to feed the beast?
Decoding the Droop: Signs of Thirst and Excess
Your cauliflower plant will tell you when it’s thirsty. Wilting leaves, especially in the cooler morning or evening hours, are a clear sign of insufficient water. Conversely, yellowing lower leaves combined with stunted growth can indicate overwatering or poor drainage. Learning to read these subtle cues is an insider tip that distinguishes a novice from a master grower. The rhythm of watering becomes intuitive over time, but always err on the side of checking frequently rather than waiting for obvious signs of distress. Getting this right paves the way for the next crucial phase: feeding your champion.
Nutrient Nirvana: Feeding Your Giants for Unprecedented Yields
Your colossal cauliflower aspirations depend entirely on a robust, consistent feeding regimen. Think of your plant as an Olympic athlete: it needs a specialized diet, precisely timed, to perform at its peak and achieve truly phenomenal results. Skimp on nutrition, and your dreams of a massive curd will shrivel faster than an unblanched head in the sun. This is where many gardeners fall short, providing general nutrients when a targeted approach is what’s truly needed. What’s the secret sauce for spectacular size?
ADVERTISEMENT
Cauliflower is a heavy feeder, especially of nitrogen in its vegetative stage and then phosphorus and potassium as it moves towards forming a head. When you first plant your seedling, incorporate a balanced slow-release granular fertilizer into the top few inches of the potting mix. This provides a steady baseline. After about 3-4 weeks, or once the plant is well-established and growing vigorously, begin a liquid feeding schedule. Initially, use a fertilizer slightly higher in nitrogen (e.g., 20-5-10) every 2-3 weeks to promote lush, healthy leaf growth. Once the plant starts to show signs of forming a curd (a tiny head appearing in the center), switch to a fertilizer lower in nitrogen and higher in phosphorus and potassium (e.g., 5-10-10 or even a “bloom booster” formula) every two weeks. This shift encourages curd development rather than just foliage. But there’s a vital, often-forgotten micronutrient that can make or break your cauliflower’s quest for size. Are you missing this critical element?
The Micronutrient Masterstroke: Boron’s Hidden Power
Here’s a surprising fact that can elevate your cauliflower game: cauliflower has a particular need for boron. A deficiency in boron can lead to hollow stems, browning curds, and stunted growth – all antithetical to your goal of a giant, perfect head. While often present in compost, supplementing can be a game-changer. You can find boron in some complete micronutrient blends or apply it as a foliar spray (diluted according to instructions) if you suspect a deficiency. Just be careful, as too much boron can be toxic. Regular, moderate application of a balanced nutrient solution that includes micronutrients is your safest bet. Proper feeding is the fuel; now, let’s talk about how to protect your precious curd and ensure its pristine white appearance.
Blanching: The Secret to White Gold and Flawless Form
You’ve nurtured your cauliflower with meticulous care, providing the perfect pot, soil, water, and nutrients. Now, as the tiny curd begins to form in the center, a crucial step emerges that separates a good cauliflower from a truly magnificent one: blanching. This isn’t about cooking; it’s about protecting. If left exposed to direct sunlight, the developing curd will turn yellowish or purplish, develop a bitter flavor, and have a less appealing texture. Blanching is the horticultural equivalent of keeping a valuable treasure under wraps, preserving its pristine beauty. But how do you perform this subtle art, and when is the precise moment to act?
Blanching typically begins when the cauliflower head (curd) is about 2-4 inches (5-10 cm) in diameter. The traditional method involves gently gathering the outer leaves of the plant and tying them loosely over the developing curd with twine or soft string. You want to provide shade without stifling air circulation, which could lead to rot. Some gardeners even break a few outer leaves and bend them over the head, tucking them in to secure them. For self-blanching varieties, nature does most of the work, but a little extra leaf manipulation can still enhance results, especially for maximizing size. The goal is complete darkness. Keep checking under the leaves every few days to ensure the curd is protected and to monitor its growth. This simple act of protection is often overlooked, yet it’s the final polish on your masterpiece. But even with perfect blanching, your plant isn’t immune to external threats. Are you ready for battle?
ADVERTISEMENT
Timing is Everything: The Blanching Window
The duration of blanching varies depending on the variety and growing conditions, usually taking 1-3 weeks until the head is ready for harvest. Begin blanching too early, and you might inhibit further growth. Wait too long, and your curd might already be discolored. This timing is a critical “insider tip.” Regular inspection is key. This careful attention to detail ensures your efforts culminate in a beautiful, perfectly white cauliflower. But a perfect head also needs protection from unseen enemies – the pests and diseases that lie in wait. Are you prepared to defend your champion?
Pest and Disease Patrol: Safeguarding Your Giant Cauliflower, Organically
As your cauliflower plant grows larger and more magnificent, it inevitably becomes a more attractive target for common garden pests and diseases. A small infestation or early infection can quickly compromise the health of your plant, stunting growth and ruining your chances of a truly colossal curd. The beauty of container gardening is the ease of inspection and intervention, allowing for precise, organic solutions that keep your plant healthy without resorting to harsh chemicals. This isn’t just about problem-solving; it’s about proactive defense, ensuring every bit of your plant’s energy goes into curd production, not fighting off invaders. What’s your first line of defense?
Common cauliflower pests include cabbage worms (the larvae of white cabbage butterflies), aphids, and flea beetles. Inspect your plants daily, especially the undersides of leaves. For cabbage worms, hand-picking them off is surprisingly effective for a few plants. For aphids, a strong jet of water can dislodge them, or you can use insecticidal soap, ensuring complete coverage. Flea beetles can be deterred by reflective mulches around the base of the plant or by applying diatomaceous earth. Diseases like clubroot or downy mildew are less common in containers due to better drainage and air circulation, but always ensure good air circulation around your plant and avoid overhead watering to minimize fungal issues. Prevention is always better than cure. But there’s a subtle, natural alliance you can form to boost your defenses even further.
The Power of Companions: Natural Pest Deterrents
Consider placing companion plants around your cauliflower pot. Marigolds and nasturtiums can deter certain pests, while dill, cilantro, and mint can attract beneficial insects like ladybugs, which are natural predators of aphids. This bio-friendly approach reduces your reliance on interventions and creates a healthier mini-ecosystem around your prized plant. Keeping your plant stress-free is the ultimate defense. A strong, healthy plant is inherently more resilient. With pests under control, let’s talk about supporting the sheer weight of your burgeoning masterpiece.
ADVERTISEMENT
Support Systems: Anchoring Your Masterpiece for Optimal Growth
As your cauliflower head swells to impressive dimensions, its weight can become a significant challenge, especially for a plant rooted in a relatively confined pot. A large head, combined with a strong gust of wind, can easily snap the main stem or topple the entire pot, turning your dreams of grandeur into a literal pile of broken aspirations. Providing proper support isn’t a sign of weakness; it’s a testament to your foresight and commitment to achieving a truly monumental harvest. This proactive step ensures your plant can focus all its energy on curd development, rather than struggling to stay upright. What’s the best way to brace for success?
For large cauliflower varieties, even in sturdy pots, a simple staking system can make all the difference. As the plant matures and the head begins to gain weight, insert a sturdy stake (bamboo or metal) into the soil close to the main stem, being careful not to damage the roots. Loosely tie the main stem to the stake using soft ties or old strips of cloth. The key is “loosely” – you want to provide support without restricting growth or causing chafing. For exceptionally large heads, or if your pot is not extremely heavy, consider placing the pot inside a larger, heavier decorative planter, or even using a tomato cage around the plant early on to provide all-around support as it grows. This prevents stem breakage and ensures air circulation around the developing curd, a subtle “aha moment” that can prevent disaster. With your plant securely anchored, you’re almost at the finish line. The moment you’ve been waiting for is just around the corner.
Weathering the Storm: Wind Protection for Potted Giants
Potted plants, especially those with top-heavy growth like large cauliflower, are vulnerable to wind. Position your pots in a somewhat sheltered location, perhaps against a wall or fence, or among other sturdy plants. If a severe storm is predicted, consider moving your potted champion to an even more protected area, like a garage or patio cover. This simple act of environmental management can save your plant from irreversible damage and ensure your colossal cauliflower makes it to harvest day intact. Now, for the most rewarding step of all: bringing your magnificent creation indoors.
Harvesting Your Masterpiece: The Triumphant Climax of Your Efforts
The moment has arrived! After weeks of diligent care, precise feeding, and meticulous blanching, your colossal cauliflower stands ready for harvest. This is the culmination of your dedication, the tangible proof of your green thumb. Knowing exactly when and how to harvest is critical to ensuring the best flavor, texture, and indeed, size retention. Picking too early means sacrificing potential growth; waiting too long can result in a bitter, “ricy” curd that quickly deteriorates. Don’t let all your hard work be undone at the last minute. So, how do you know your magnificent head is truly ready?
ADVERTISEMENT
Your cauliflower is ready for harvest when the head is firm, dense, white, and has reached your desired size. It should feel compact when gently squeezed. The florets should be tightly packed, without any signs of loosening or “riciness” (where the individual florets begin to separate). The size will vary by variety, but for your “largest cauliflower” goal, you’ll be looking for a head that fills a significant portion of your pot. To harvest, use a sharp knife to cut the main stem just below the head, leaving a few wrapper leaves attached. These leaves help protect the curd and keep it fresh until you’re ready to use it. Harvest typically occurs 75-120 days after planting, depending on the variety and growing conditions. This precise timing ensures peak flavor and appearance, making your harvest a true triumph. But what happens after you’ve cut that beautiful head? The journey doesn’t have to end there.
Beyond the Curd: Unlocking Secondary Harvests
Here’s an insider tip that rewards patient gardeners: don’t pull out the entire plant immediately after harvesting the main head. Sometimes, the plant will produce smaller, secondary heads (or “side shoots”) from the leaf axils. While these won’t be as large as the main curd, they offer a delightful bonus harvest. Continue to water and feed the plant, and keep an eye out for these smaller gems. This bonus harvest extends the life of your plant and your efforts, giving you even more to savor from your potted champion. But what if, despite all your efforts, things don’t go exactly as planned? Troubleshooting is the next essential skill.
Troubleshooting: When Things Go Wrong – Diagnosing and Fixing Common Cauliflower Calamities
Even the most dedicated gardener encounters challenges. Despite your best efforts, your cauliflower might not perform as expected, presenting symptoms that leave you scratching your head. Perhaps the head is too small, or the leaves are discolored, or worse, there’s no head at all! These setbacks can be disheartening, but understanding common issues and their solutions is crucial. This is where experience truly shines, transforming potential failures into valuable learning opportunities. Don’t despair if your cauliflower isn’t picture-perfect; every problem has a solution, and mastering these fixes will deepen your understanding and elevate your gardening prowess. Are you ready to become a plant detective?
Common Cauliflower Conundrums and Their Cures:
Buttoning (Premature, Small Heads): This is perhaps the most common disappointment. It occurs when young plants are stressed by extreme temperatures (too hot or too cold), inconsistent watering, or nutrient deficiencies (especially phosphorus).
ADVERTISEMENT
Solution: Ensure consistent moisture, protect young plants from temperature extremes (use shade cloth in heat, row covers in cold), and provide balanced fertilization from the start. Proper hardening off is critical.
Ricy or Fuzzy Heads: The curd appears loose, granular, or develops a fuzzy texture.
Solution: Usually caused by harvesting too late, over-maturity, or exposure to excessive heat during curd formation. Harvest promptly when the head is firm and dense. Ensure consistent watering during this crucial phase.
Browning or Purple Heads: Discoloration of the curd.
ADVERTISEMENT
Solution: Primarily due to insufficient blanching or exposure to sunlight. Ensure the curd is completely covered by leaves during its development. Purple heads can sometimes be a genetic trait, but often indicate sun exposure.
Hollow Stems: The main stem is hollow or discolored internally.
Solution: A classic sign of boron deficiency. Ensure your fertilizer mix includes micronutrients, or apply a foliar spray with diluted boron. Also, overly rapid growth due to too much nitrogen can contribute.
Leggy Seedlings: Long, spindly seedlings with weak stems.
ADVERTISEMENT
Solution: Insufficient light. Provide strong, direct light (grow lights are best indoors) and ensure proper spacing. Air circulation can also help strengthen stems.
Pest Damage: Holes in leaves, chewed curds, or visible insects.
Solution: Regular inspection is key. Hand-pick larger pests like cabbage worms. Use insecticidal soap for aphids. Consider companion planting for natural deterrence. Remember, early detection prevents widespread damage. Now that you’re armed with troubleshooting skills, let’s explore how to push the boundaries even further with advanced techniques.
Advanced Techniques for Pro-Level Growers: Elevating Your Cauliflower Game
You’ve mastered the fundamentals, triumphed over common challenges, and harvested a respectable cauliflower. But for those truly aiming for the pinnacle of potted cauliflower cultivation – to consistently produce massive, flawless heads that amaze everyone – there are advanced techniques that can give you an undeniable edge. These aren’t just tips; they’re strategies for environmental manipulation, subtle interventions that unlock latent potential within your plant. Are you ready to graduate to the next level of cauliflower artistry?
ADVERTISEMENT
Season Extension: Beating the Clock for Bigger Harvests
Cauliflower prefers cool weather. If your growing season is short or prone to extreme heat, extending the optimal growing window can significantly impact head size.
Cold Protection: For early spring or late autumn plantings, use cloches, row covers, or even simple plastic bottles cut in half to create mini-greenhouses over young plants to protect them from unexpected frosts.
Heat Mitigation: During hot spells, relocate your potted cauliflower to a shadier spot during the hottest part of the day. Use shade cloth (30-50% shade) to reduce direct sun exposure. Consistent moisture becomes even more critical in heat. This level of environmental control is a massive advantage of growing in pots. It’s about giving your plant exactly what it needs, precisely when it needs it, regardless of what the weather is doing.
Precision Pruning and Leaf Management: Directing Energy to the Curd
While cauliflower generally doesn’t require heavy pruning, strategic leaf management can be beneficial.
ADVERTISEMENT
Removing Lower Yellowing Leaves: As the plant grows, older lower leaves may yellow. Remove these as they can become a drain on the plant’s resources and potentially harbor pests or diseases. This helps direct energy towards the developing curd.
Targeted Leaf Removal (Caution): In very rare cases, if outer leaves are excessively dense and preventing airflow around the developing curd (even after blanching), you might selectively remove one or two, but this should be done with extreme caution. The leaves are the plant’s solar panels, and removing too many will inhibit growth. This is a subtle intervention, an “insider tip” for maximizing air circulation and energy focus. This meticulous attention to detail is what truly differentiates a good harvest from a legendary one.
Mulching Your Pot: The Unseen Regulator
Even in pots, mulching can provide surprising benefits. Apply a 1-2 inch layer of organic mulch (like straw, shredded leaves, or wood chips) on top of the soil in your pot.
Moisture Retention: Mulch significantly reduces water evaporation from the soil, keeping moisture levels more consistent, which is paramount for cauliflower.
ADVERTISEMENT
Temperature Regulation: It helps insulate the soil, keeping roots cooler in hot weather and warmer in cool weather.
Weed Suppression: While less of an issue in pots, mulch still helps suppress any stray weeds that might compete for nutrients. This simple addition can significantly reduce your watering efforts and create a more stable environment for your plant, allowing it to focus its precious energy on growing that enormous curd. This isn’t just about growing a plant; it’s about engineering an optimal growth environment. But how does this all translate into real-world success, and why does it feel so personal?
The Unbelievable Journey: A Personal Triumph of Patience and Persistence
Let me share a quick story. Years ago, living in a small city apartment, my dream of a lush vegetable garden felt impossible. I yearned for the satisfaction of growing my own food, particularly something as substantial as cauliflower. The notion of cultivating a large head in a pot seemed utterly ridiculous, a horticultural pipe dream. I started small, with flimsy plastic containers and a generic bag of potting mix. My first few attempts yielded nothing more than a few pitiful, button-sized curds – more frustrating than fulfilling. I felt defeated, convinced that “real gardening” required acres of land. But a stubborn part of me refused to give up, fueled by the sheer audacity of the challenge.
I devoured every piece of information I could find, realizing that my failures weren’t due to a lack of space, but a lack of *knowledge* and *precision*. I invested in proper large pots, learned about soil pH, and discovered the magic of boron. I started seeds indoors under grow lights, treating each tiny seedling like a precious gem. My neighbors would chuckle, seeing me tie up cauliflower leaves with meticulous care, or adjust the position of a pot by mere inches to catch the perfect sun angle. They watched, fascinated, as one particular plant began to swell, its leaves forming a protective embrace around something truly magnificent within. The day I harvested that first truly massive, perfectly white cauliflower from my patio, the sheer weight of it in my hands felt like a trophy. It wasn’t just a vegetable; it was a testament to persistence, to the idea that with enough dedication, seemingly impossible dreams can blossom into breathtaking realities. This personal connection, this quiet triumph, is what makes growing something as challenging as a giant cauliflower in a pot so uniquely rewarding. And it’s a feeling you’re about to experience for yourself. What will you do with your glorious harvest?
ADVERTISEMENT
Beyond the Harvest: Savoring, Storing, and Sharing Your Potted Prodigy
Congratulations! You’ve successfully cultivated a magnificent, colossal cauliflower in a pot, defying conventional wisdom and proving your horticultural prowess. Now, with this impressive bounty in hand, the journey shifts from growing to savoring. This final phase is about maximizing your enjoyment, preserving the fruits of your labor, and perhaps even inspiring others with your exceptional achievement. Don’t let your hard-won masterpiece go to waste, or simply disappear into a forgotten corner of the fridge. This is your moment to shine, to truly appreciate the incredible effort that went into creating this edible marvel. What’s next for your champion curd?
Your freshly harvested cauliflower is at its peak flavor and texture. For immediate use, simply rinse, chop, and enjoy. Roasting, steaming, or creating a creamy cauliflower mash are fantastic ways to showcase its fresh, sweet flavor. If you’ve harvested a truly enormous head, you might find yourself with more than you can eat in a few days. Cauliflower stores well in the refrigerator for up to a week, ideally wrapped loosely in a damp paper towel or plastic bag in the crisper drawer. But for longer preservation, consider freezing. Cut the head into florets, blanch them briefly in boiling water for 3-5 minutes, then plunge into ice water to stop the cooking process. Drain thoroughly, pat dry, and then freeze on a baking sheet before transferring to freezer bags for long-term storage (up to 8-12 months). This simple step ensures you can enjoy your homegrown goodness for months to come, a continuous reward for your dedication.
Sharing the Success: Inspiring Your Community
Your giant potted cauliflower is more than just food; it’s a conversation starter. Share your triumph! Take photos, brag a little (you earned it!), and consider sharing some of your bounty with friends, family, or even a local food pantry. Your success might just be the spark that encourages someone else to try their hand at container gardening, proving that even in small spaces, incredible things can grow. This act of sharing not only spreads joy but also solidifies your identity as a master grower. The lessons learned, the patience practiced, and the sheer joy of seeing something grow from seed to splendor are invaluable. This is not the end of your gardening journey, but merely the beginning of countless more triumphs. What other seemingly impossible feats will you attempt in your container garden next? The possibilities are as limitless as your ambition. Keep growing, keep learning, and keep surprising yourself with what you can achieve!
